SketchUp Rendering: The Complete Guide [2026]

Turn your SketchUp models into photorealistic renders in seconds — no expensive hardware or complex setup required.
SketchUp is one of the most popular 3D modeling tools for architects and designers. But if you've ever tried to show a client a raw SketchUp model, you know the problem: it doesn't look real.
Clients want to see photorealistic images. They want to feel like they're standing in the space. And that's where rendering comes in.
The good news? SketchUp rendering has changed dramatically in the past year. What used to take hours of setup and expensive GPU hardware can now be done in seconds with AI-powered tools.
In this guide, I'll walk you through everything you need to know about rendering in SketchUp — from traditional plugins to the new AI-powered options that are changing the game.
Does SketchUp Have Built-In Rendering?
No. SketchUp doesn't include native rendering capabilities.
Out of the box, SketchUp shows your model with basic colors, textures, and shadows. But it doesn't calculate reflections, realistic lighting, or the kind of material detail that makes a render look photorealistic.
To create professional renders from SketchUp, you need either:
A rendering plugin that works inside SketchUp
An external rendering application you export to
An AI rendering tool that processes your model in the cloud
Each approach has tradeoffs. Let's break them down.
The 3 Ways to Render SketchUp Models
Option 1: Traditional Rendering Plugins
Traditional renderers like V-Ray, Enscape, and Lumion have been the industry standard for years. They produce stunning results — but they come with significant barriers.
How they work: You install the plugin, set up materials, configure lighting, position cameras, adjust settings, and wait for the render to process. Each image can take anywhere from a few minutes to several hours depending on quality settings and scene complexity.
The good:
Maximum control over every detail
Industry-proven quality
Extensive material libraries
The challenges:
Steep learning curve (weeks to months to master)
Expensive ($350-$700/year for most professional options)
Requires powerful hardware (high-end GPU, 32GB+ RAM recommended)
Slow iteration (changing one thing means re-rendering)
Best for: Large firms with dedicated visualization specialists who need absolute control over every pixel.
Popular options:
V-Ray ($350/year) — The industry standard. Maximum control, maximum complexity.
Enscape ($504/year) — Real-time rendering with a gentler learning curve.
Lumion ($499/year) — Known for fast results and good asset library.
Option 2: Real-Time Renderers
Real-time renderers like D5 Render and Twinmotion show you a photorealistic preview as you work. Changes appear instantly, which speeds up the design process.
How they work: You sync your SketchUp model to the renderer, which displays a live preview. As you make changes in SketchUp, the render updates in real-time or near-real-time.
The good:
Instant feedback
Faster iteration than traditional renderers
D5 Render has a free tier
The challenges:
Still requires learning new software
Needs capable hardware (though less demanding than V-Ray)
Quality varies based on your GPU
Best for: Designers who want faster feedback loops but still want hands-on control.
Option 3: AI Rendering Tools
AI rendering is the newest category — and it's changing everything about architectural visualization.
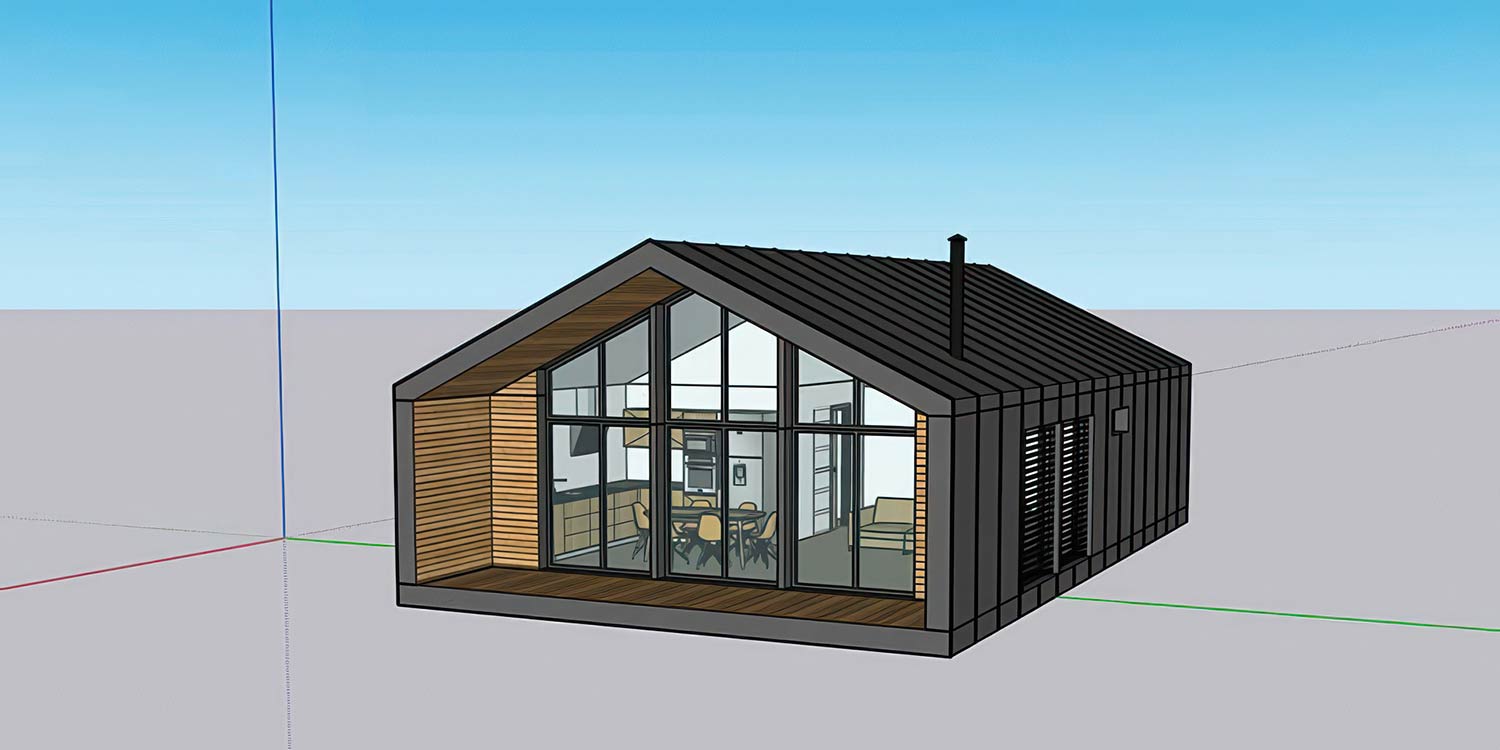
How they work: You upload your SketchUp model (or a screenshot of it), and AI generates a photorealistic render in seconds. The AI handles lighting, materials, and scene setup automatically.
The good:
No learning curve
No expensive hardware (runs in the cloud)
Renders in seconds, not hours
Fraction of the cost
The challenges:
Less granular control than traditional tools
Quality depends on the AI model
Most tools only accept screenshots, not actual 3D files
Best for: Architects and designers who need fast, affordable renders without becoming rendering specialists.
This is where most AI tools fall short: They only accept 2D screenshots of your model. You take a screenshot in SketchUp, upload it, and the AI interprets what it sees. But because it's working from a flat image, you can't change the camera angle after the fact. You're locked into whatever view you captured.
The exception: Some AI tools — including ArchRender — can import actual 3D model files (OBJ, FBX, GPL). This means you can adjust your camera angle, change the field of view, and explore different perspectives before rendering, all without going back to SketchUp.
How to Export Your SketchUp Model for Rendering
The export process depends on which type of renderer you're using.
For Traditional Plugins (V-Ray, Enscape)
No export needed — these plugins work directly inside SketchUp. Just install the extension and access it from the Extensions menu.
For Real-Time Renderers (D5 Render, Twinmotion)
Most real-time renderers have a sync plugin:
Install the SketchUp connector/plugin for your renderer
Open your SketchUp model
Click the sync button
Your model appears in the rendering application
For AI Renderers (Screenshot-Based)
Most AI rendering tools work from screenshots:
Set up your view in SketchUp
Go to File > Export > 2D Graphic
Choose PNG or JPG
Upload to the AI tool
The limitation: Once you export a screenshot, that camera angle is fixed. If you want a different view, you need to go back to SketchUp and export again.
For AI Renderers (3D Model Import)
If your AI renderer supports 3D files, you have more flexibility:
In SketchUp, go to File > Export > 3D Model
Choose OBJ, FBX format (depending on what your tool accepts)
Upload the 3D file to the renderer
Adjust camera angles directly in the rendering tool
Render from any perspective without re-exporting
ArchRender also has a Sketchup extension that let's you export your 3D model directly into ArchRender.
Export tips for best results:
Check "Export Texture Maps" to include your materials
For FBX, use the "ASCII" format for better compatibility
Keep file sizes manageable by purging unused components before export
Step-by-Step: Rendering with AI (The Fast Way)
Here's how to go from SketchUp model to photorealistic render in under a minute using an AI tool.
Step 1: Prepare Your Model
Before exporting, make sure your model is render-ready:
Apply materials — Even basic colors help the AI understand what surfaces should look like
Check scale — AI works better when models are at realistic scale
Clean up — Delete hidden geometry and purge unused components
Set the scene — Frame your view the way you want the final render to look (if using screenshot-based tools)
Step 2: Export Your Model
For screenshot-based AI tools:
Navigate to your desired view
File > Export > 2D Graphic
Save as PNG at high resolution (at least 1920x1080)
For 3D model AI tools:
File > Export > 3D Model
Choose OBJ or FBX
Enable texture export
Step 3: Upload and Configure
Upload your file to your AI rendering tool. Most tools let you adjust:
Style — Modern, traditional, minimalist, etc.
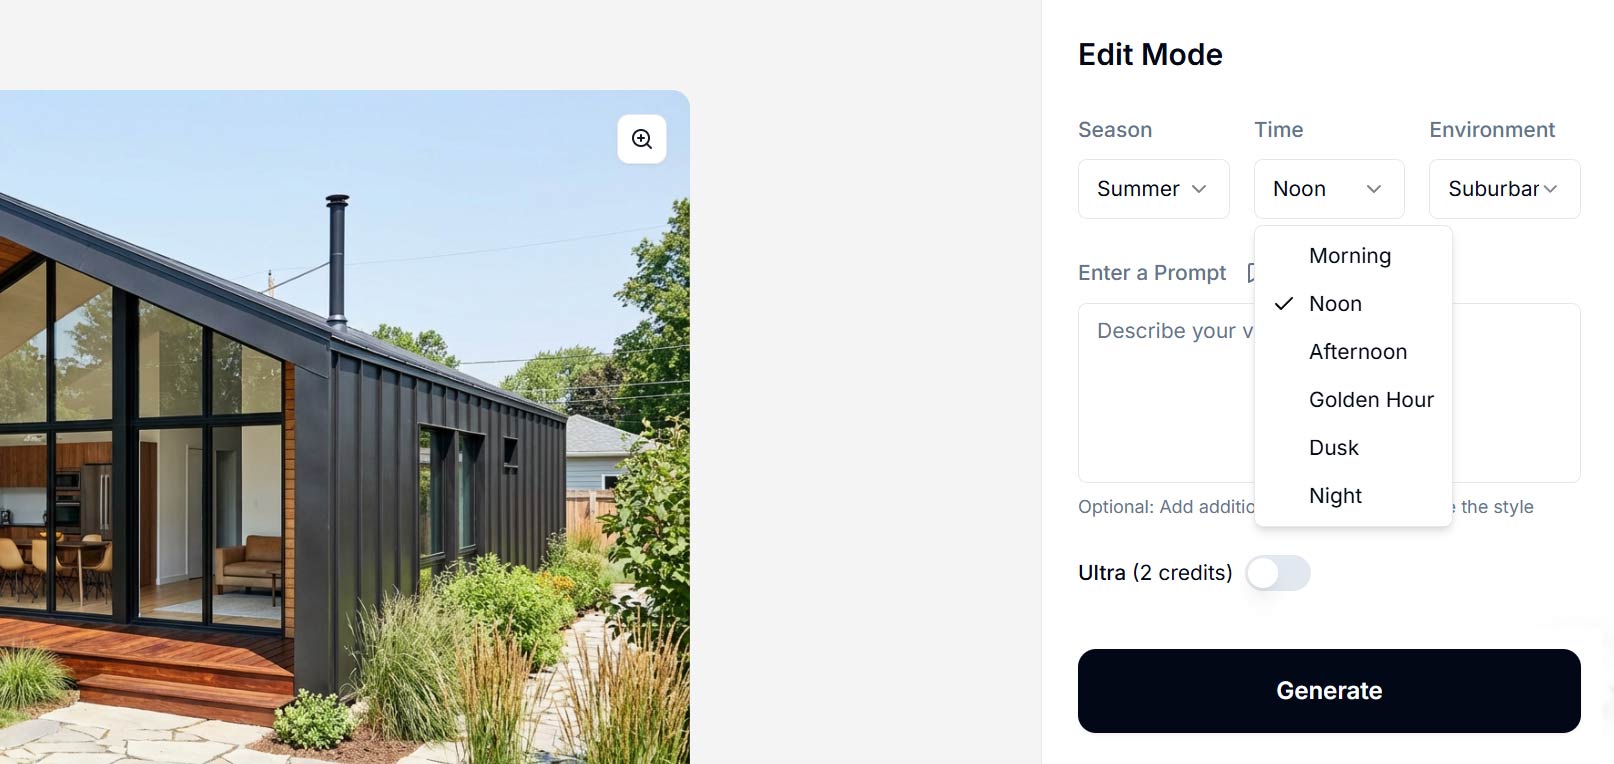
Time of day — Morning, afternoon, sunset, night
Weather/mood — Clear, overcast, dramatic
Season — Summer greenery vs. winter snow
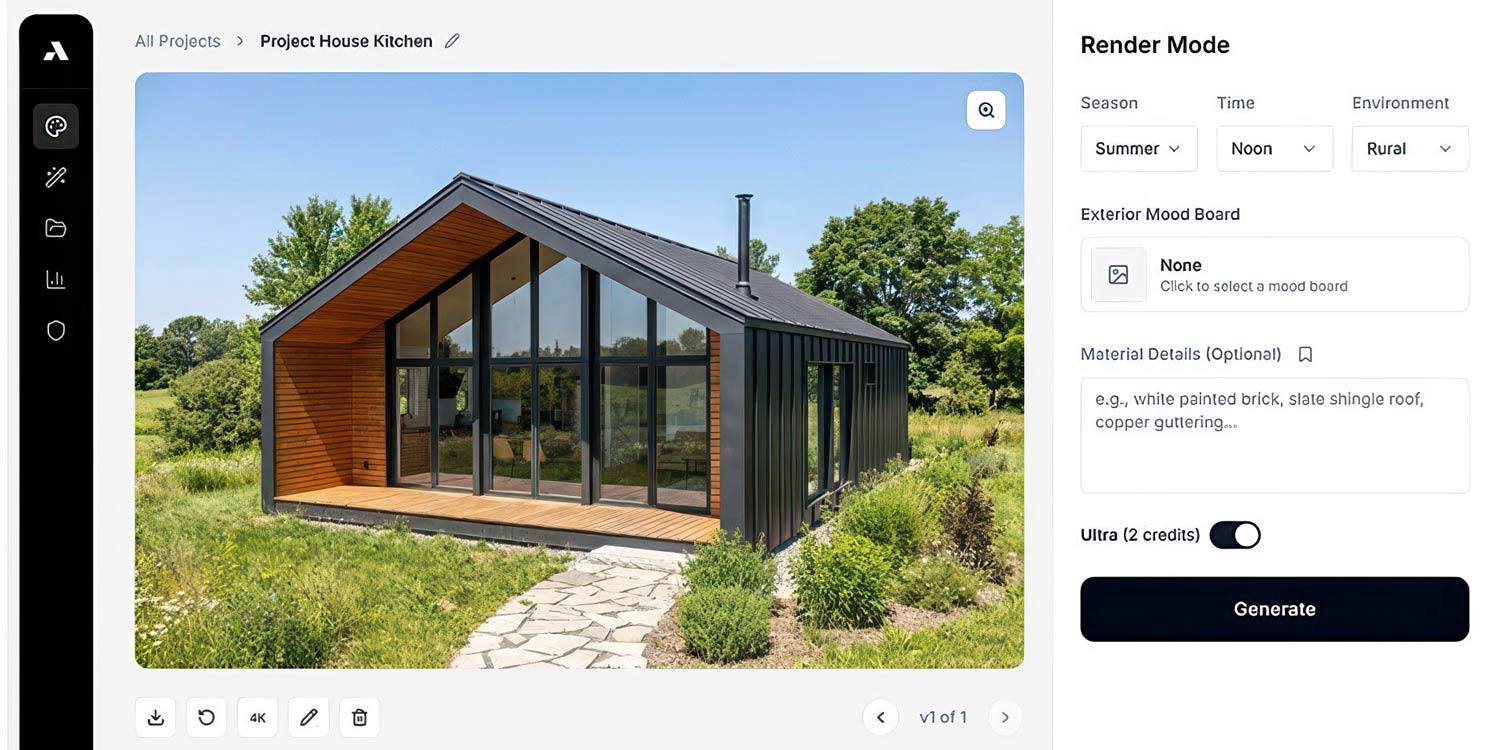
Step 4: Generate Your Render
Click render and wait a few seconds. The AI handles:
Realistic lighting based on your time-of-day setting
Material interpretation (making wood look like wood, glass look like glass)
Environmental context (sky, landscaping, surroundings)
Photorealistic finishing touches
Step 5: Refine If Needed
Most AI tools let you:
Regenerate with different settings
Edit specific areas with text prompts ("add more plants," "change the floor to hardwood")
Upscale to 4K for presentations
Total time from SketchUp to final render: 30 seconds to 2 minutes.
Comparing SketchUp Rendering Options
Feature | V-Ray | Enscape | AI Tools | |
|---|---|---|---|---|
Learning curve | Weeks | Days | Days | Minutes |
Render time | Minutes-hours | Seconds-minutes | Seconds | Seconds |
Hardware required | High-end GPU | Mid-range GPU | Mid-range GPU | None (cloud) |
Annual cost | $350+ | $500+ | Free-$300 | $150-600 |
Control level | Maximum | High | High | Moderate |
Best for | Specialists | Design reviews | Live presentations | Fast iteration |
Which Rendering Method Should You Choose?
Choose traditional rendering (V-Ray) if:
You have a dedicated visualization team
You need pixel-perfect control over every detail
Clients expect a specific "look" you've developed
Budget for software and hardware isn't a constraint
Choose real-time rendering (Enscape, D5 Render) if:
You want instant feedback during design
You present live to clients often
You have a decent workstation but don't want the V-Ray learning curve
You want to walk clients through the space virtually
Choose AI rendering if:
You need renders fast and can't spend weeks learning new software
You don't have (or don't want to invest in) high-end hardware
You're a solo practitioner or small firm watching costs
You want to iterate quickly through multiple design options
You value speed over absolute control
Tips for Better SketchUp Renders (Any Method)
Regardless of which rendering approach you choose, these principles will improve your results:
1. Model with materials in mind
Even if AI handles the final look, starting with appropriate materials helps. A surface tagged as "brick" will render more accurately than one left as default gray.
2. Pay attention to scale
Rendering engines use scale to calculate realistic lighting and material behavior. A model at the wrong scale will have materials that look "off" — wood grain too large, bricks too small.
3. Don't forget the context
A beautiful building floating in a void looks strange. Add ground planes, surrounding context, sky, and landscaping — either in SketchUp or through your rendering tool.
4. Consider your camera settings
Eye-level perspectives feel natural and help clients imagine themselves in the space
Wide angles can distort proportions — use them sparingly
The rule of thirds applies to architectural visualization too
5. Lighting makes or breaks the render
Golden hour (early morning, late afternoon) creates warm, flattering light
Overcast provides soft, even illumination that shows details
Night renders with interior lights glowing can be dramatic
Common SketchUp Rendering Problems (And How to Fix Them)
Problem: Render looks flat or unrealistic
Solution: Check your materials. Generic materials produce generic results. Add bump maps, reflectivity, and appropriate textures.
Problem: Render takes forever
Solution: Reduce model complexity. Hide or delete geometry that won't be visible. Use proxies for vegetation and detailed objects.
Problem: AI changes my design too much
Solution: Look for AI tools that preserve geometry. Screenshot-based tools may "interpret" your design loosely. 3D model import tools maintain your exact geometry.
Problem: Materials look wrong scale
Solution: Check your model's units. If you modeled in meters but the renderer expects feet, everything will be off.
Problem: Interior renders are too dark
Solution: Add artificial light sources in your model, or use your rendering tool's lighting options to boost interior illumination.
The Future of SketchUp Rendering
The rendering landscape is shifting fast. Traditional tools still produce the highest-quality results for those who master them, but the gap is closing.
AI rendering is democratizing visualization. Architects who couldn't afford dedicated visualization staff can now produce professional renders in seconds. The barrier to entry has dropped from "thousands of dollars in software and hardware plus weeks of training" to "upload your model and click render."
For most architects and designers, the question is no longer "can I afford professional renders?" It's "which rendering approach fits my workflow?"
My recommendation: Start with an AI tool to get renders fast. If you find yourself needing more control, you can always layer in traditional tools later. But for most client presentations and design iterations, AI rendering is now good enough — and fast enough — to be your primary workflow.
Ready to try AI rendering with your SketchUp models?
ArchRender imports actual 3D files from SketchUp (OBJ, FBX, glTF), giving you full camera control before rendering. No screenshots required. No expensive hardware. Just upload your model and get photorealistic renders in seconds.
This guide is part of our series on architectural visualization. Also see: The Best Lumion Alternative in 2026 and Best AI Rendering Software for Architects.